

Assembled Apollo Frame


Note: Motors, Limit Switches, Belt Tensioners, and Fan Installation are covered in later tutorials.
Pallet Layout
pallet 1 & 3

pallet 5

pallet 13

pallet 7

pallet 8

pallet 9

pallet 10

pallet 11

pallet 12

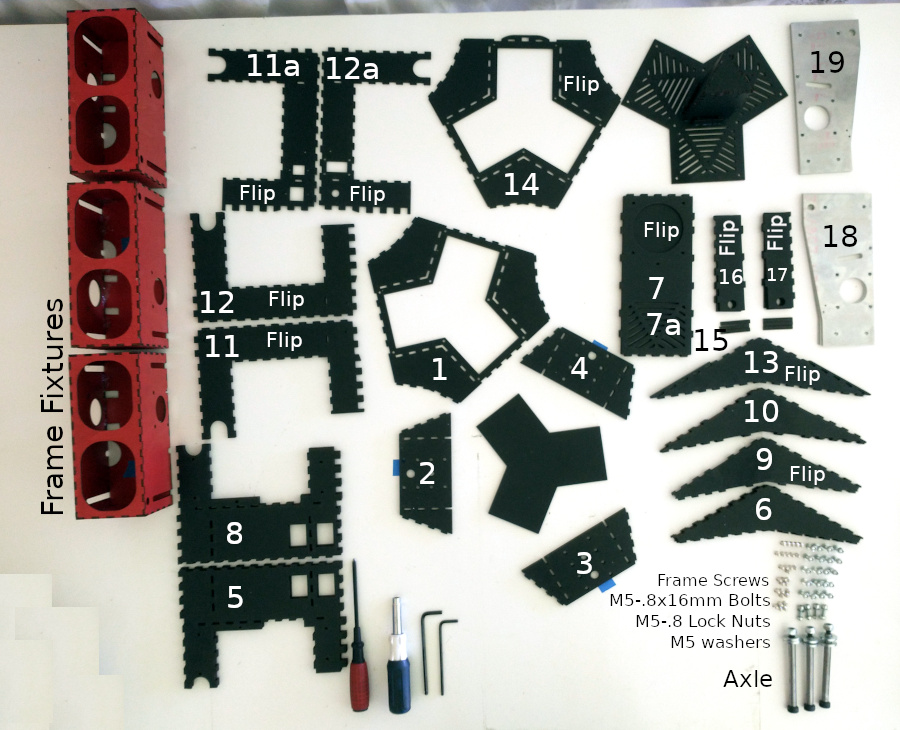
Assembly Layout
Procedure
-
Open the Apollo Kit on a large table or work surface.
-
Cover your work surface with polyethylene or parchment-paper as a protective barrier.
- Tip: parchment paper comes with every robot kit, separating all the laser cut pallets.
-
PPE: Wear safety glasses and nitrile gloves when working with epoxy glue.
-
Prepare the glue gun, locate the Frame flat-pack, and have tape ready.
-
Lay out the Frame and Assembled Frame Fixtures as shown in the Assembly Layout image. You will be using parts from Pallets 1,3,5,7,8,9,10,11,12 and 13. Set unused parts aside.
- Axles, nuts, bolts, washers and frame screws are in the hardware bags.
-
Locate Aluminum Motor Plates #18 & #19.
-
Dry-fit the Frame and test-fit in fixture as shown in This Video
- Make sure Part 7a is aligned with the tab on part 14, to hold the air-filter
- Locate air-filter section directly opposite the back of Apollo (the USB, Power, Ethernet & Aux ports are on the back side of Apollo)
- Insert the frame screws loosely at first to hold the Aluminum Plates in place. Tighten frame screws fully once frame fixture is installed and bolted to aluminum plates.
-
Next disassemble and lay parts back into the Assembly Layout configuration.
-
Apply glue and assemble Primary Arms as shown in This video
- Apply glue to the frame surfaces which make contact one piece at a time as shown.
- You will have approximately 1 to 3 hours work time before the epoxy starts to harden.
- Epoxy set time is around 1 hour at 90F, 2 hours at 80F, 3 hours at 70F, 4 hours at 60F.
-
Once Frame is Glued together, apply Sikaflex Elastomer to frame surfaces which Aluminum Plates make contact with
- Apply enough, but not too much, as to cause a mess.
- Excess elastomer can be cut off with a razor about 24hrs after assembly.
- Elastomer takes upwards of a week to fully cure. After 24 hours it is usually hardened enough to handle the frame for further assembly.
-
Tape, rubber-band or clamp the glued item while the epoxy sets.
-
Store the Epoxy Gun in a Gallon Freezer Bag in your Freezer. Simply warm it to room temperature the next time you need it.
-
Apply Aluminum Foil over the elastomer plastic tip to stop it from hardening in the tube.